

There are certain experiences to which everyone can relate, and the hassle of removing your car’s registration sticker is one of them. These seemingly feeble stickers are designed to stay firmly attached to your car for a year or more, so getting them off your windshield or license plate is not always the easiest task. And once you’ve removed the old sticker, you’ll need to place a new one in the correct location.
But just like every other task, there are easier and more efficient ways of accomplishing this chore. Here are a few tips on how to remove a registration sticker and how to affix a new vehicle registration to make the process a little smoother.
Why the Need for Vehicle Registrations?
As troublesome as they may be, registration stickers are part of an important system of cataloging every car on the road. This lets authorities know the vehicle’s rightful owner.
By law, every automobile must be registered with a state’s department of motor vehicles. Otherwise, the car is not allowed on public roads. Failure to register your car could lead to fines or having your vehicle impounded.
You’ll need a new vehicle registration any time you buy or lease a new car, move to a new state or when your current registration expires. Each state dictates the length of vehicle registrations, but they generally need to be renewed every year or two.
Unsure about the vehicle registration laws in your state? Click here to learn more.

Buying a New Car
Tips and tricks to get you through every step of buying a new car, whatever “new” means to you.
Download Now!How to Remove a Registration Sticker
Registration stickers are designed to stay in place for a lengthy period of time, so removing them can require some elbow grease. At the same time, you want to be careful not to scratch or damage your windshield or license plate.
First warm the sticker with a heat gun on low, a hair dryer or by parking in the sun. Heat will soften and loosen the adhesive, making it easier to remove.
Start by freeing a corner of the sticker. Use a plastic razor blade to scrape a corner loose if you can’t do this with your fingers.
As you pull the sticker off with one hand, use the razor blade in your other hand to help separate it from the surface.
As the sticker comes loose, fold it over itself, referred to as 180-degree release, rather than pulling it at a 90-degree angle.
Once the sticker’s off, there will likely be some leftover glue stuck to the car’s surface. You can clean it off with rubbing alcohol, auto glass cleaner or a product like Goof Off or Goo Gone.
Did you know that you can renew your registration at select AAA branches? Find out which DMV/RMV services are available in your state.
How to Apply a New Vehicle Registration Sticker
Placing a replacement registration sticker on your car isn’t quite as burdensome as removing one. There are, however, a few important details to keep in mind.
- Car registrations expire so you’ll eventually need to replace your sticker. While it may be physically possible to place a new sticker on top of a previous one, this is not advised and many states mandate you remove any old registrations.
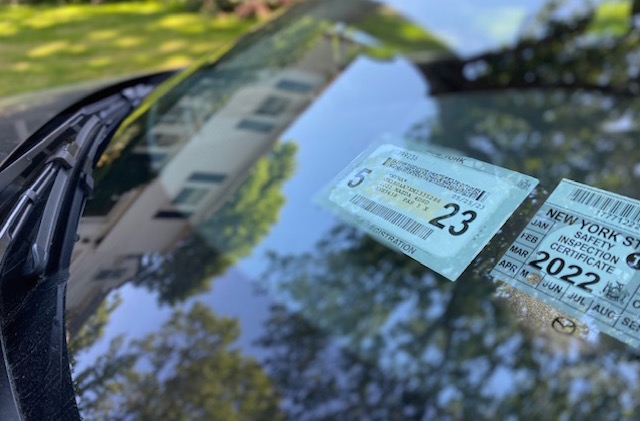
- In New York, you must attach any windshield stickers to the lower left-hand corner of the inside of the windshield, to the right of the inspection sticker (if you’re looking at it from the driver’s seat). In Rhode Island and Massachusetts, registration stickers must be attached to your license plate.
- The vehicle identification number must be visible from the outside of the vehicle. To make sure the VIN is visible, ask someone to stand outside the car while you apply the sticker. If you’re alone, try rolling down the window and applying the sticker with your right hand as you look through the windshield from the outside.
Learn about DMV services available at a AAA branch near you.
Do you have any tricks for dealing with registration stickers? Let us know in the comments below!
Trending Articles


NEWEST ARTICLES


8 Thoughts on “How to Apply and Remove a Vehicle Registration Sticker”
Leave A Comment
Comments are subject to moderation and may or may not be published at the editor’s discretion. Only comments that are relevant to the article and add value to the Your AAA community will be considered. Comments may be edited for clarity and length.
Related Articles

NEWEST ARTICLES
TRENDING ARTICLES


“….Otherwise, the car is not allowed on public roads…”. As if driving on Massachusetts roads is a privilege. Our legislators should be banned from driving on our taxpayer-funded roadways until they responsibly design and maintain them – between I90’s lack of upgrades over 60 years, bridge repair and every road’s endless potholes, they should be held to a mandate and registration fees should be used for nothing except that infrastructure improvement.
no comment
Use a sponge thoroughly soaked with warm water, place a towel on the dash to catch the drips and spills. Press the sponge against the entire old sticker and let it soak for 2 minutes. Then use a one sided razorblade and slide it under one upper corner and work your way down to the other side. Add more soaking water from the sponge of necessary. When done, use the wet sponge to clean off the glass and dry with a paper towel and let it dry completely. Then peel off the waxed covering over the edges of the new sticker and carefully position it to where you want it to go. Try to match it up evenly and level with any other sticker (inspection) already on the windshield. Using this technique, I’ve been able to peel off old registration stickers in one piece (with the edge lettering still intact) and keep them in my collection dating back many years for all my cars. 🙂
I coordinate the date of my inspection with the date of my registration and have the service man replace my sticker. I don’t know what he uses, but it takes him about 30 seconds.
Just move to Connecticut, DMV doesn’t use stickers.
Changing the registration sticker has always been troublesome for me, so the tips are appreciated.
What about removing registration sticker in winter when it’s cold and/or snow?
“heat gun … hair dryer”